
What is Goofballs?
Goofballs is a goofy physics-based soccer game where players roll, dash, and ground pound their way to victory. With a variety of ball types, playing surfaces, and arenas there are hundreds of combinations to play!
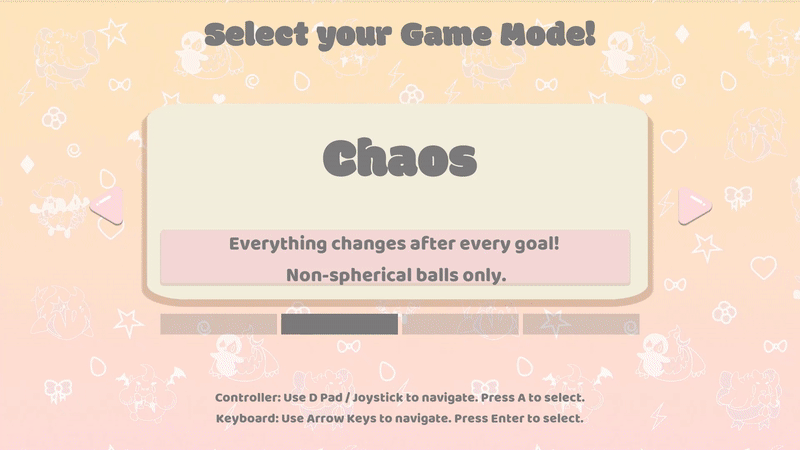
Play locally against friends or the computer in 1v1 and 4-player free-for-all matches. Choose from the Classic, Chaos, and Competitive game modes or create your own gameplay experience in Custom mode.
Development Methodology
Goofballs was developed using an Agile development model with Scrum. The leads and producers planned milestones for the development of the game while the development team implemented features according to milestone requirements.
Development Specification
- Role: Gameplay/UI Programmer
- Engine: Unreal Engine v4.22.3
- Development Time: 6 Months
- Team Size: 12 (3 Programmers)
What I did
Game Systems Overview
During the early development milestones, it was important to create a solid basic framework for our game. I was involved in developing the early framework for this system while discussing an architecture for the same. Below are some of the basic features we required to implement:
- Characters and player controllers
- At least 1 ball type to score with
- Playing surfaces that can change
- Goal systems
To achieve this, we decided to develop a model that used the game instance class to track progress overall while each level would have its own goal logic and randomization system.
Here’s a diagram of what that architecture looked like
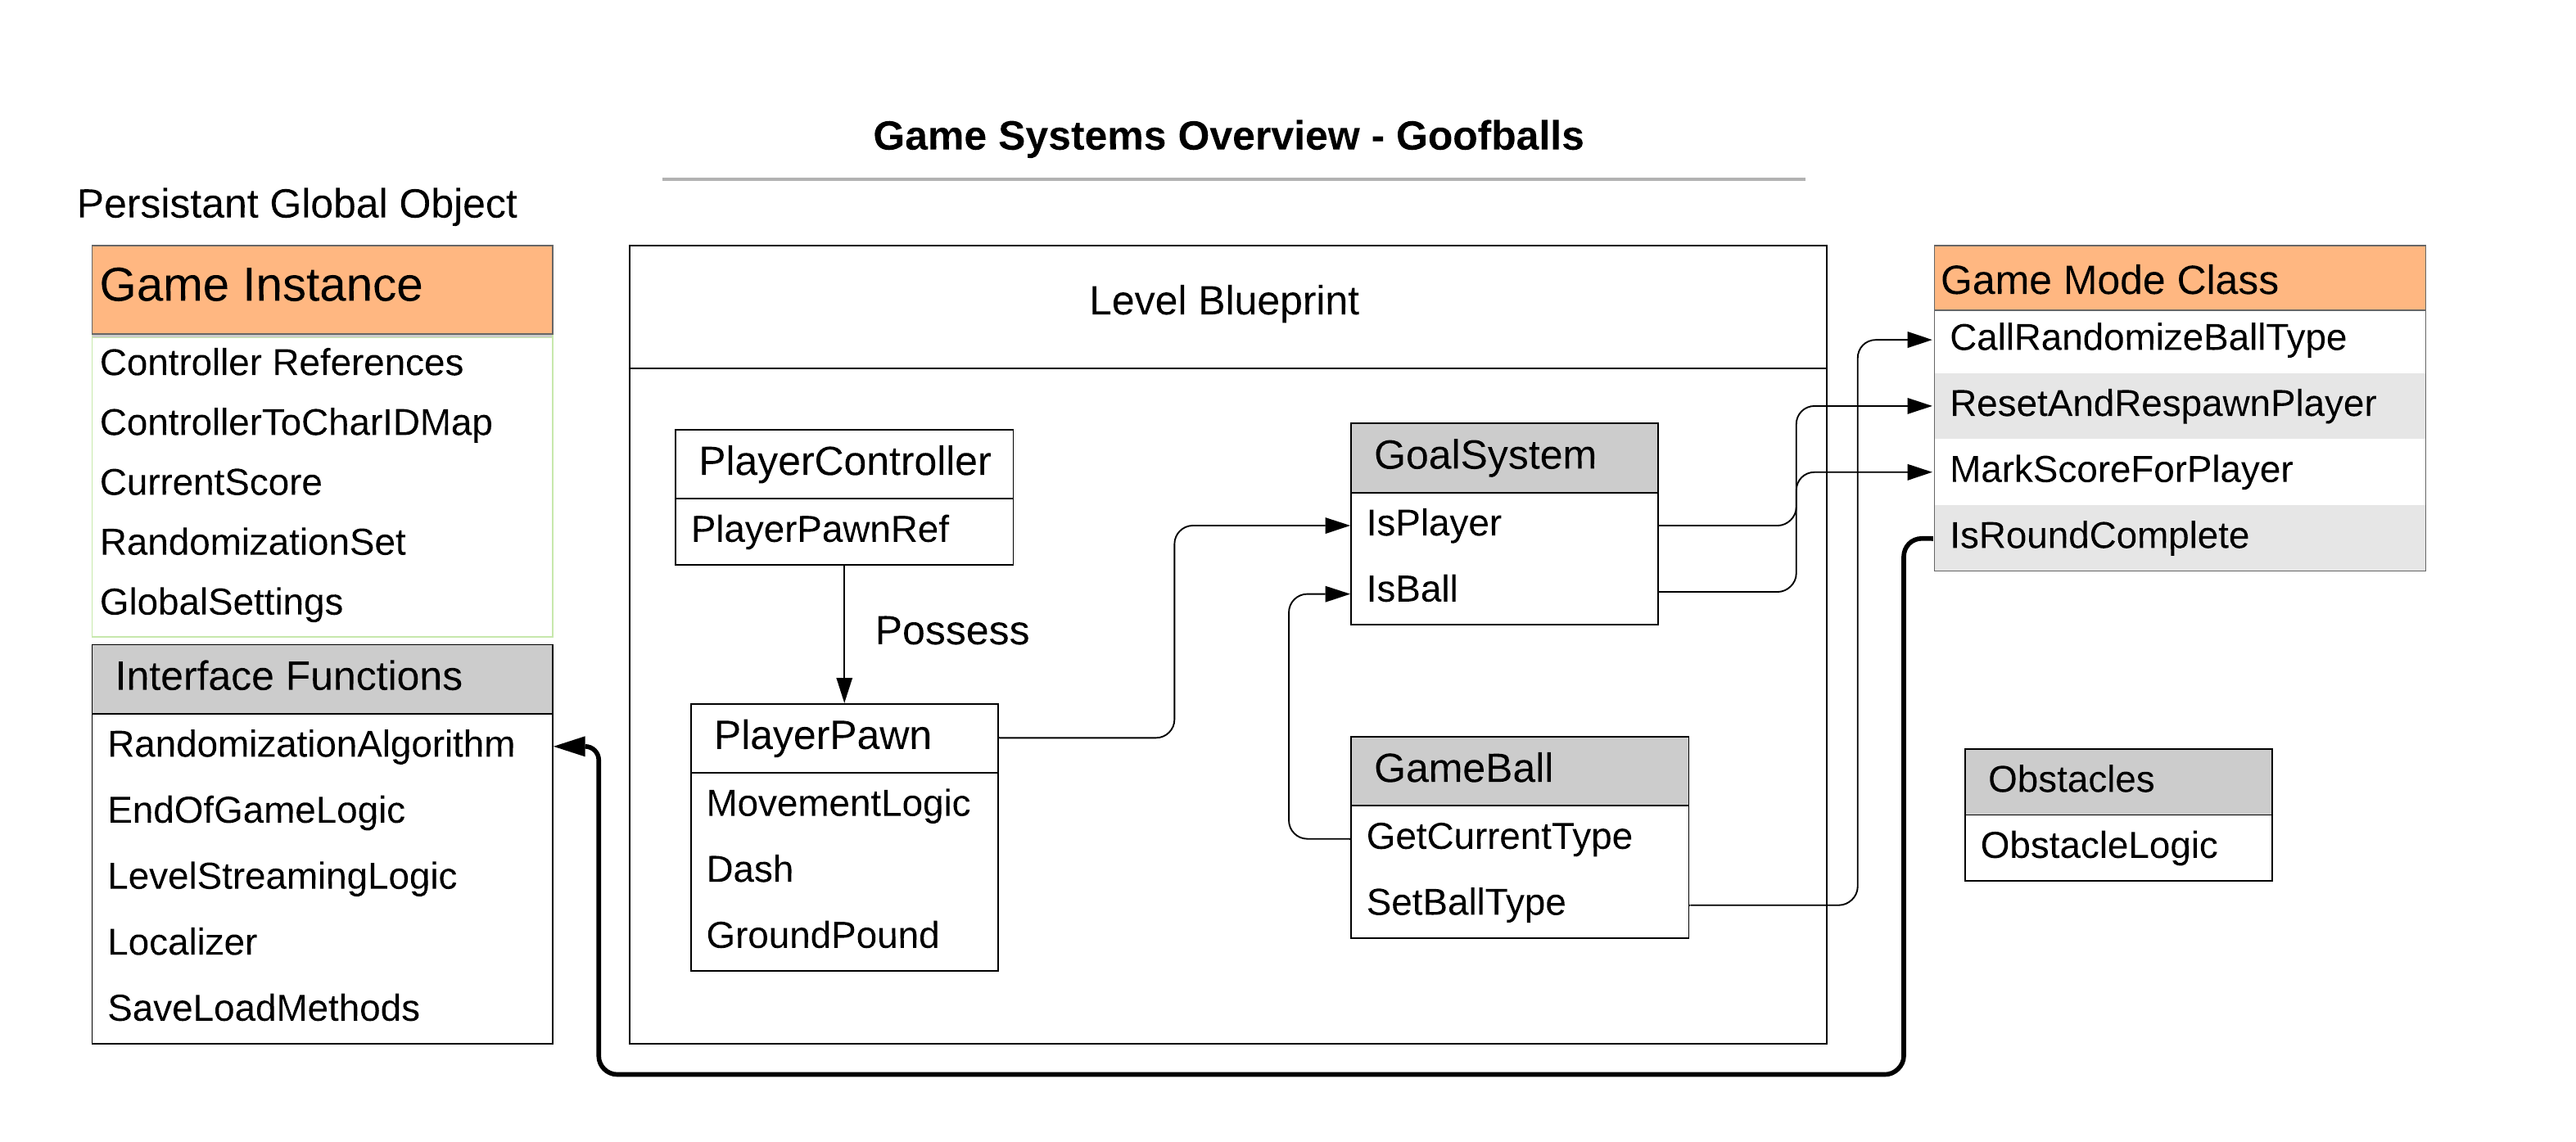
As highlighted in the image above, all persistent information such as the references to player controllers, the map of the player controller to their corresponding character, score as well as randomization logic is all stored in the Game Instance object. Each level would consist of a Goal System and a game ball. The Goal System would determine which player it is associated with and handles logic to respawn players who fall into the goal, it also handles the scoring logic by calling the required functionality on the Game Mode class.
The Game Mode class is doing all the “heavy lifting” in terms of logic by determining which goal fired a score event and which player must receive the point for the scored goal. The Game Mode also calls randomization logic on the Game Instance when required as well as fire the event for the end of game state by virtue of which the game logic will load up the required UI levels.
Below is a blueprint highlighting some of the goal logic involved in the game mode class for Goofballs:
All the methods that needed to handle the use of objects whose lifetime would persist throughout the execution of the game were implemented in the Game Instance object. This included score logic, randomization logic for levels, balls, surfaces as well as the global game values to handle awards at the end of game assigned based on player performance.
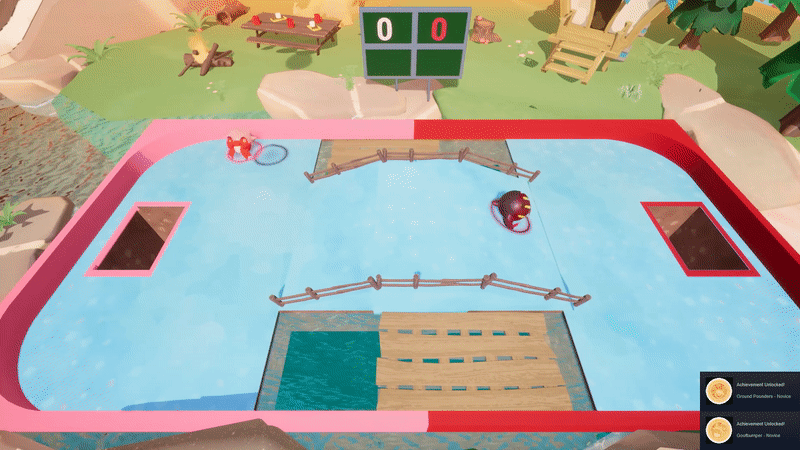
Here’s what the gameplay looked like (Note: Reduced quality in GIF, the in-game view is in full resolution) :
Here’s some of the randomization logic used to determine which level must be loaded when a load is requested but also ensure that all levels are covered at least once:
Below is the award info calculation logic:
By the end of the Proof of Concept Gameplay(POCG) milestone, we were able to finalize on this architecture and develop further features as required by our game on the specified classes.
The need for a UI Framework
Since our game has numerous variables such as the frequency at which ball types change as well as the corresponding frequencies for surface type, arena and game variable changes, we would need a UI system that could convey all these changes to the player intuitively.
Team User Story:
- I want to be able to navigate menus using either a controller or a keyboard.
- I want to be able to change audio, video and language settings in the game.
- I want to be able to join a game and select characters in the UI.
- I want to be able to select game modes or make my own custom game mode by editing switch values for balls, surfaces, and arenas.
Solution: A robust UI framework
In order to account for the differing inputs, custom sliders, custom selection widgets and such, my lead and I discussed the option of developing a UI framework during the POCG and Vertical Slice milestones.
What I learned from my previous attempt at a UI Framework (From Go Go-Karts project):
- We need a good way to handle input for each widget.
- Reduce redundant code by incorporating an interface common to all widgets.
- Allow customization for the artist to incorporate their art in an intuitive manner.
The intent was to have a framework in place by the end of POCG and to utilize the framework to develop some high priority widgets by the end of the Vertical Slice milestone. The high-priority widgets included the following screens:
- Main Menu Widget
- Character Select Screen
- End of game award screen
- Loading Screens
- Some settings panels (Audio and Video)
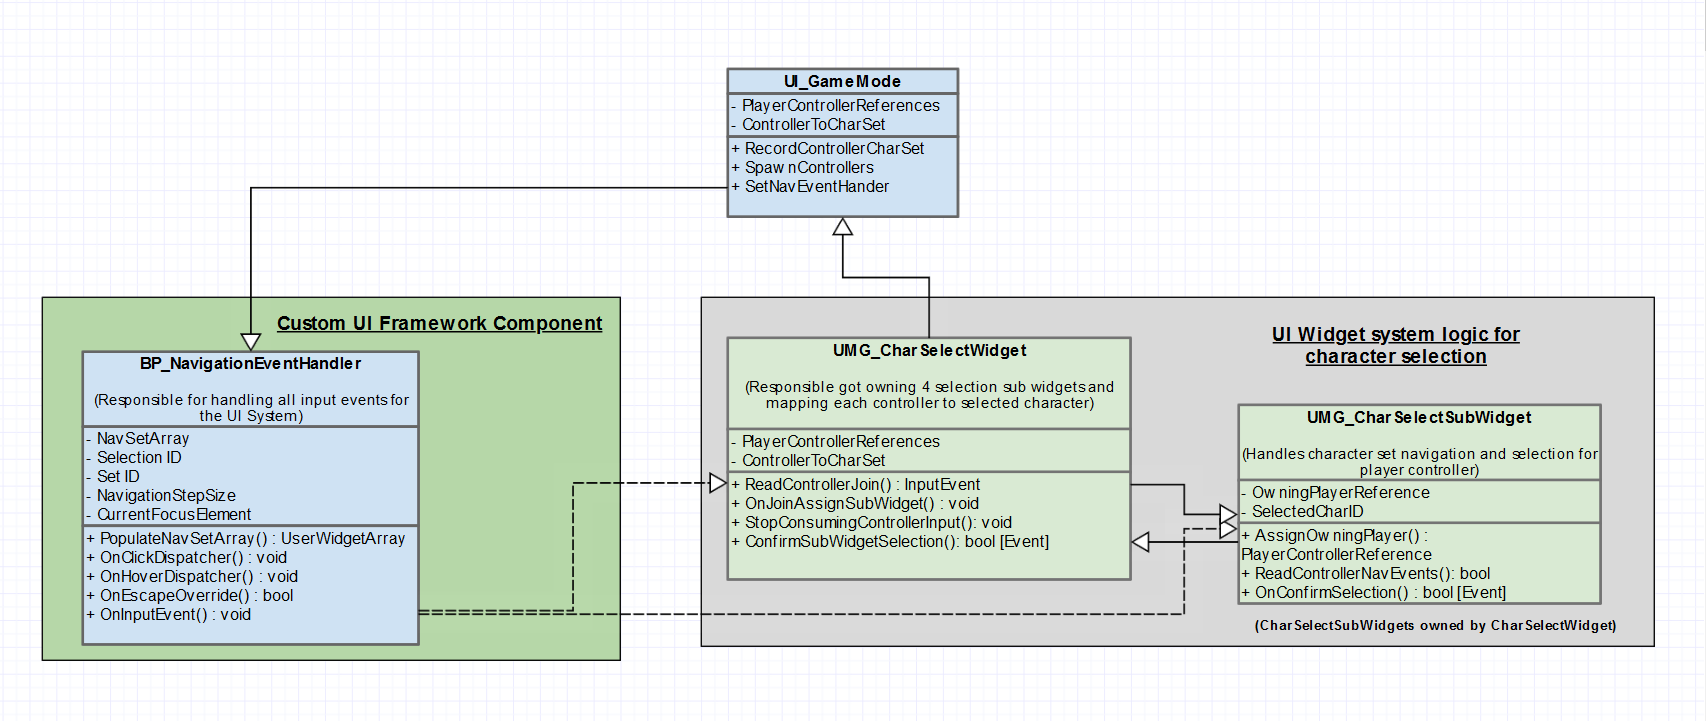
To incorporate a framework to account for all the requirements to develop the above screens, I followed an object-oriented approach to developing a UI System. Here’s a diagram of the architecture I implemented:
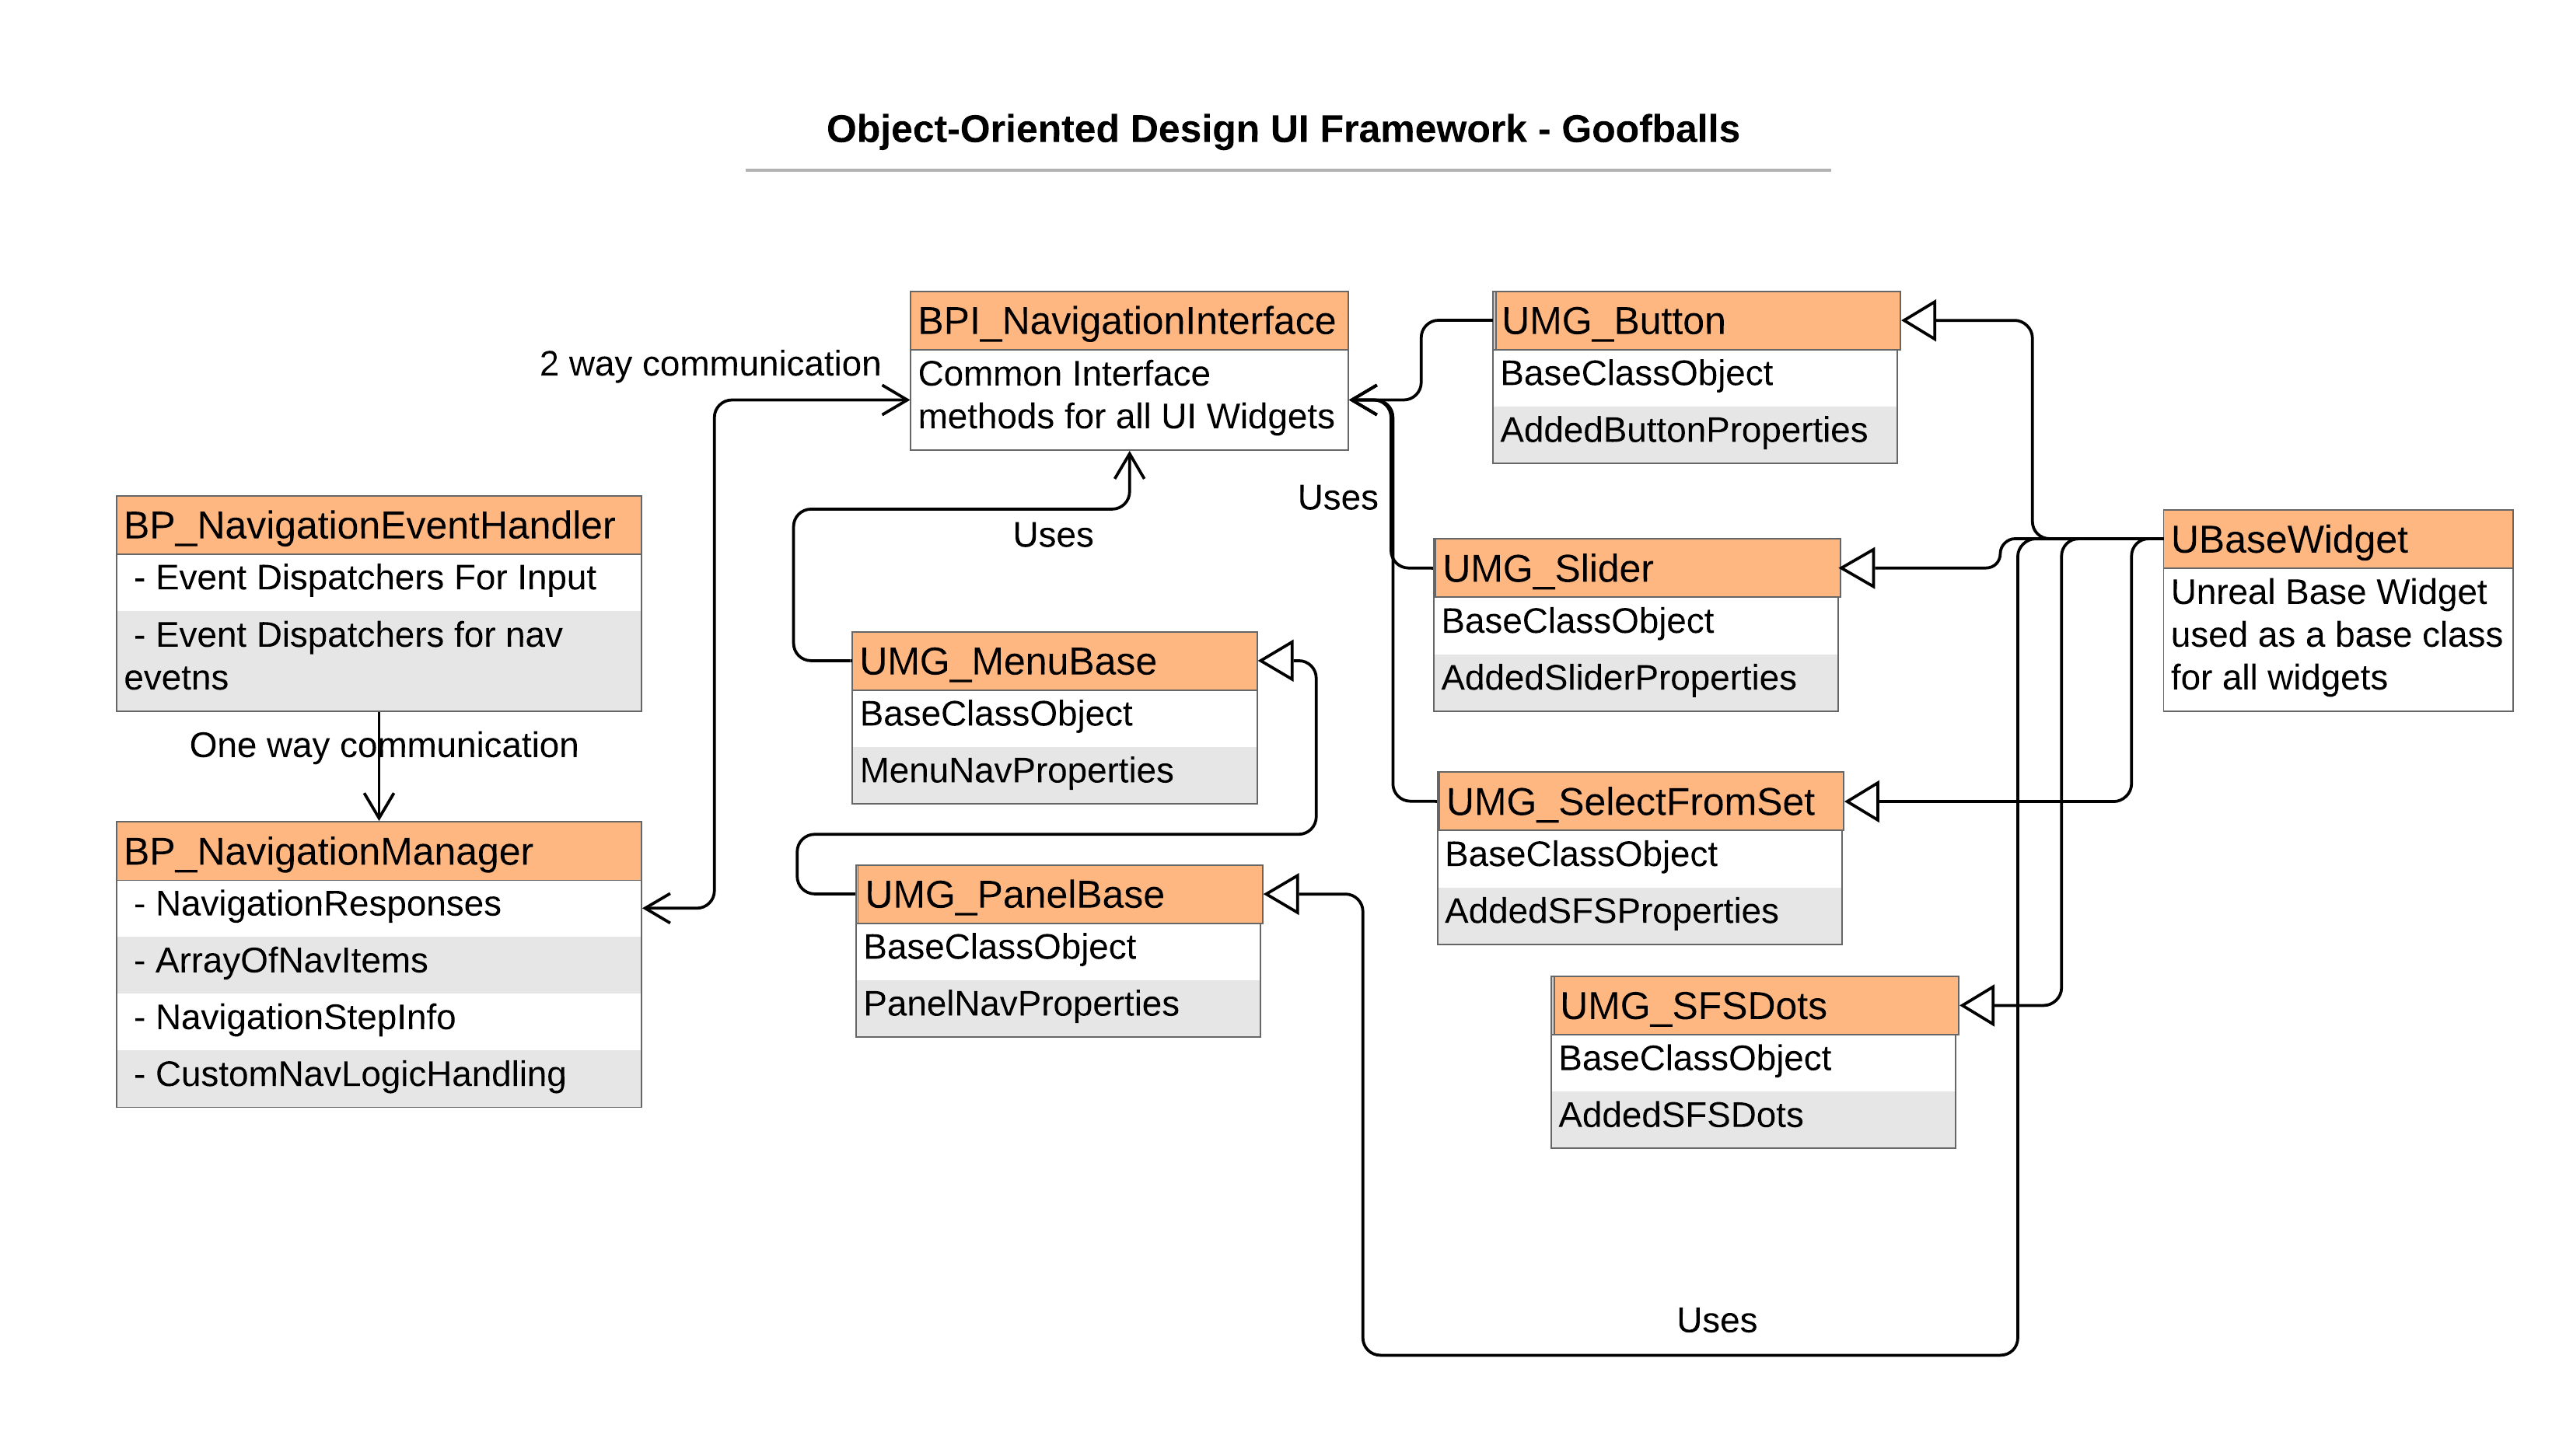
To create a common interface between all UI widgets, I incorporated a blueprint interface that would handle the loading of navigable data, the navigation logic, the UI events that would be fired based on input and which input events would handle what logic.
Here’s a concise document describing the role of each interface function
//Event Dispatch responsible for Mouse events
static bool OnMouseClick(UFunction* dispatchFn);
static bool OnMouseHover(int selectedIndex, int stepIndex, UFunction* dispatchFn);
static bool OnEscapeCall(eEscapeBehavior behavior, UFunction* dispatchFn);
static bool OnBackClick(UFunction* dispatchFn);
static bool OnValueChange(bool isIncreasing, UFunction* dispatchFn);

//Interface Functions
void 								ChangeValue(bool isLeft);
void 								OnClick();
void 								SetEventHandler(EventHandler* eventHandler);
EventHandler* 						GetEventHandler();
void 								SetIndex(int selectedIndex, int stepIndex);
void 								GetIndex(int* selectedIndex, int* stepIndex);
void 								SetFocus();
void 								RemoveFocus();
NavItemAction*						GetNavigationAction();
int									GetSelectedIndex();

//Navigation Functions
std::vector<WidgetReferences&>& 	AddWidgetToNavArray(NavItem& navigationItem);
std::vector<WidgetReferences&>& 	GetNavItemsFromContainer(Widget& BoxWidget, bool isHorizontal = false);
void								SetNavigationFocus(int stepIndex = 0, bool shouldAddFocus = true);
void								NavItemMouseHover(int selectedIndex = 0, int stepIndex = 0);
void								NavItemMouseUnhover(int selectedIndex = 0, int stepIndex = 0);
void								Navigate(Key& pressedKey, std::array<Key&>& expectedKeys, eNavActionType actionType, std::string customAction);
void								RemoveWidgetFromNavArray(int stepIndex =0, bool removeFromArrayOnly = false);
EventReply							OnInput(Key& key);
void								NavigateUp();
void								NavigateDown();
void								NavigateLeft();
void								NavigateRight();
void								CycleLast();
void								CycleFirst();
void								UpdateValue(bool increase = false);
void								SimulateClick();
void								SetOverrideEscape(bool overrideEscape = false);
void								RemoveUnfocusedSteps(bool escKeyPressed = false);
std::vector<NavItem&>&				GetNavigableItemList();
void								CustomNavigation(std::string customAction);
void								NavigateTo(int index = 0);
int 								GetCurrentStep();
Widget&								GetSelectedItem();
void								OnValueChanged(bool increase = false);
std::vector<Widget&>&				GetNavItemsFromScrollBox(ScrollBox& scrollBox);
This needed some enumerators and structures to define the navigation options and selection options for the UI widget system. The enumerators and structures are defined below:
//Structs used for UI Interface
struct FontLable
{
	Color m_normalColor;
	Color m_hoveredColor;
	Color m_selectedColor;
}

struct NavItem
{
	Widget* m_panelReference;
	std::vector<Widget&>& m_childrenWidgets;
	int m_selectedIndex;
	BP_NavEventHandler* m_navEventHandler;
}

enum eNacActionType
{
	NONE,
	NEXT,
	PREVIOUS,
	RIGHT,
	LEFT,
	CLICK,
	CYCLE_LAST,
	CYCLE_FIRST,
	INCREASE_VALUE,
	DECREASE_VALUE,
	CUSTOM
}

struct NavItemAction
{
	eNavActionType m_onUp;
	eNavActionType m_onDown;
	eNavActionType m_onRight;
	eNavActionType m_onLeft;
	eNavActionType m_onEnter;
	NavItemCustomAction& m_customAction;
}


struct NavItemCustomAction
{
	std::string m_onUp;
	std::string m_onDown;
	std::string m_onRight;
	std::string m_onLeft;
	std::string m_onEnter;
}
Below is the logic used to add a set of navigable objects to a navigable array on the BP_NavManager object:
Below is the NavigationFocus handling logic used by the interface:
Framework Base Widget Classes Implemented
Custom UI Button
The button class implementation inherited from UUserWidget and used a custom UI interface to handle selection, navigation and input event handling. It contained a UE basic button and built on that with added style handling information as well as input handling for both keyboard and controller inputs.
Below is what the button widget blueprint looked like in Designer view
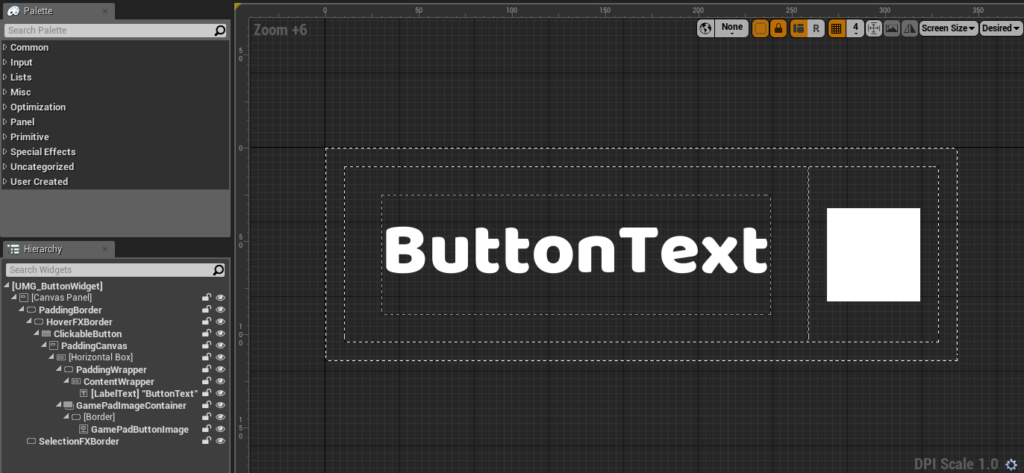
Below is the blueprint implementation used for the button:
Custom UI Select From Set Widget
To allow for selecting characters, resolution in video settings, controller options, and other such settings, it would have been useful to have a select from set UI widget. And this gave rise to a user story:
- As a player, I want to be able to cycle through my options from left to right.
- As a player, I want clear conveyance on which option I am selecting in the set and how many remaining options are to the left and the right of my currently selected option in the set.
To address this feature, I developed a select from set widget that used an array of string options, each of which was assigned an ID that mapped to a desired value based on the selection in the widget that used this select from set widget. Here’s what the widget looked like:
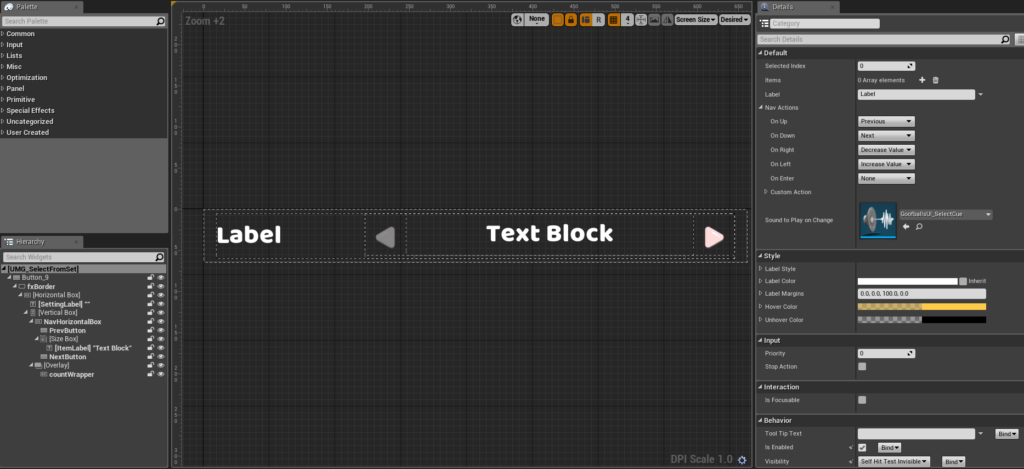
Below is the blueprint implementation used for the same:
By implementing the said framework, the team was able to create widgets and customize their functionality and appearance with ease. This allowed fast iterations and integration for each milestone without compromising on the quality and functional requirements of the widgets.
Below is the menu system in use (Note: Reduced quality in GIF, in-game view is in full resolution):
The player controller System
Now that we had a basic game framework to handle player controllers and goal-scoring logic, it was important to utilize a UI system to allow players to join the game. This needed the usage of a player controller management system. A good place to put this was in the UI system so that players who join would directly interact with the game instance class and account for the required number of players when entering game levels. To do so, I followed the following methodology:
You may view the character selection blueprint below. Clicking on the top left icon will give you a full-screen view.
This looked like so in the game (Note: Reduced quality in GIF, in-game view is in full resolution):
By accounting for each player join, I added logic for each player controller to be able to modify the character selection widget and make a note of each controller and their respective character selection
Some Interesting Problems Encountered
When developing the character selection system, one of the interesting problems we encountered was determining when input must be passed to the child widget and when it would be required for the parent. This was not an issue for handling selection logic on controllers 1,2 and 3 but for controller 0, there were some issues due to ownership of both the parent CharacterSelect widget as well as the CharacterSubWidget which was used for selecting the specific character in-game.

To resolve this issue, I used the OnPreviewKeyDown function to handle the input events received from the player controller. By doing so, I was able to control when the controller logic would affect each widget and accordingly returning either handled or unhandled events from these widgets.
Below is the logic in the Character Select parent widget:
Below is the logic used in the character selection sub widget. Please note that the parent character select widget owns 4 of these sub widgets. It assigns these sub widgets to player controllers based on when a join event is triggered.
Level Designer Utility Tool
As our game began taking shape, we found that there were a lot of variables governing randomization logic and would need to be controlled in order to aid in debugging. Our game logic would account for which levels would load in, how we would randomize between our levels and when the balls and surface types would change. As these systems were developed, there was added complexity involved when debugging issues with level loading.
The LD User story:
- As an LD, I want to be able to select which levels would be used in the game round, and their switch frequencies as goal counts.
- I also want to control the variables which handle switching of the surface, ball and arena types in the game
Solution: The toggle matrix tool!
To provide an intuitive solution for our LDs to setup changes in our game round logic, I developed a simple UI screen which we internally referred to as the “Toggle Matrix”. This toggle matrix simply allowed certain arenas, balls, and surfaces to be enabled or disabled for the game round. The values that were enabled would be sent to the game instance class and used as a list of applicable types to randomize between.
This allowed the level designers to quickly debug specific levels, balls and surface combinations and work faster and eliminate bad combinations or randomization logic.
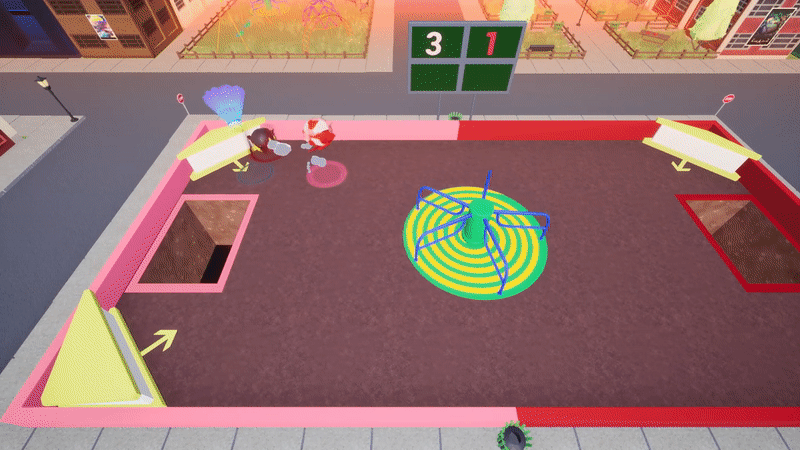
After developing this tool for internal use, we found that it could be used as a custom game mode maker in our UI game menu. By adding some art and polishing the working of this screen, our team was able to design and implement a custom game mode to Goofballs. Here’s what it looked like in the end (Note: Reduced quality in GIF, in-game view is in full resolution) :
Retrospective
What went well 🙂
- Team communication and team culture were great. It was an inclusive environment and team members were able to freely communicate their ideas for the game.
- Production and Leads teams accounted for the resources available and planned milestones to maximize efficiency
- UI Framework tools were useful to iterate quickly
- Toggle Matrix tool was well received by the team and used on numerous occasions for quick debugging.
What went wrong 🙁
- The UI framework development took longer than expected which pushed back some features to the next milestone.
- There were issues faced when handling mouse support with the UI framework implementation resulting in bugs in the menu. The mouse in menus had to be cut in the end.
- There was some miscommunication when getting the art team to work with the UI framework during the alpha milestone.
What I learned 🙂
- Devoting extra time to developing tools and frameworks is worth it when considering payoffs.
- Empowering the level designers to quickly iterate benefits the entire team.
- There could be some issues when developing common frameworks to handle events such as the case with our mouse input on the UI game mode.